时间:2010-08-14 10:56来源:蓝天飞行翻译 作者:admin 点击:次
|
cular to the radius surface. If the crack direction is not known, move the probe along and across the radius as shown in Detail XIII. (e) Edges: When you do an inspection near the edge of a part, use a nonconductive straightedge to keep the probe the same distance from the edge of the part. See Detail X to see how to examine a part near the edge. See Detail XI to examine the edge of a part. (4). Make a mark at the locations that cause signals that are more than 20 percent of the display above the balance point. NOTE; To find the end of the crack, continue to move the probe across the crack until there is no more crack signal. (5). Frequently do a check of the instrument calibration as follows: NOTE: Do not adjust the gain. (a) Put the probe on the reference standard to get a signal from the notch. (b) Compare the signal you got from the notch during calibration with the signal you get now. (c) If the signal has changed 10 percent or more, do the calibration and inspection again. 六、检查结果Inspection Results A. Fast upscale signals that are more than 50 percent of the signal height from the reference notch are signs of defects. B. Compare the signal that occurs during the inspection to the signal you got from the notch in the reference standard. NOTE: The signal from a crack can have less horizontal movement than the signal from the notch in the reference standard. See Detail VIII. (1) To find the end of a crack, continue to move the probe across the crack until there is no more crack signal. (2) To make an estimate of the depth of a crack that is less than 0.02 inch (0.5 mm) deep, compare the horizontal movement of the crack signal to the horizontal movement of the reference standard notch.A reference standard with notches that are less than 0.02 inch(0.5 mm) deep can also be used. C. The conditions specified below can also cause defect signals: (1).The probe is moved too close to an edge. Use a nonconductive straightedge to keep the probe the same distance from the edge. (2).A worn probe coil. Put a piece of tape on the surface of the probe coil or get a new probe and calibrate the instrument again. (3) Local changes in material conductivity. Compare the signal to the signal from the reference standard. Signals from conductivity changes will be slower than the signal from the reference standard. D. Do one of the procedures that follow to make sure a signal is the result of a defect. (1)Remove the surface finish and do a visual inspection with 10-power (or higher) magnification and sufficient light. (2) Do a penetrant inspection of the area as specified in Standard Overhaul Practices Manual, Subject 20-20-02, " Penetrant Inspection Methods". 二. A320 系列飞机无损检测手册简介 下面再介绍有关AIRBUS NTM 的使用
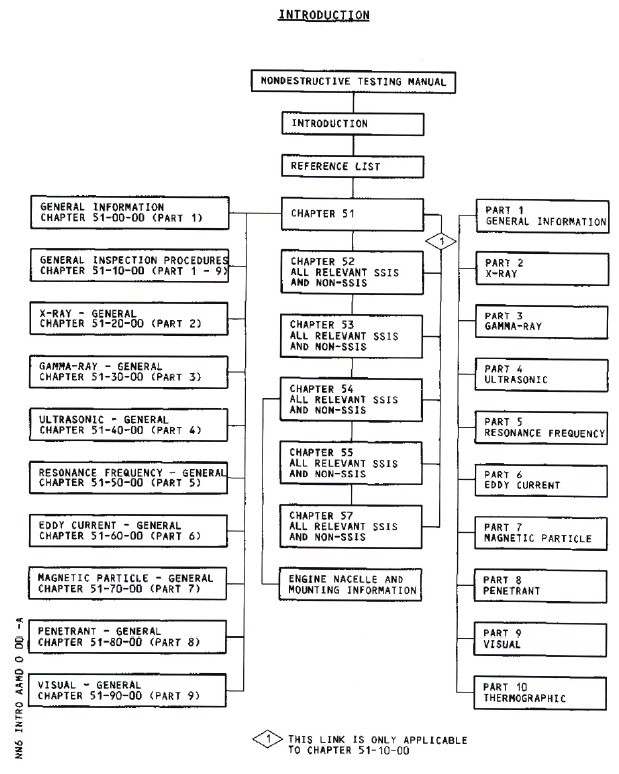 在NTM 中,按照各类方法进行了分类,也采用了按ATA 章节进行查询,
 对发动机和机载附件的修理与检查时,除参考除参考主机厂的NDT 手册及SOPM 外,还应 |